Dependant Views

While working with a client today I noticed how they were creating Dependant Views. When they learned this tip they were really upset… upset that they didn’t know about this years ago.

The first step on this is to create the original floor plan and all of its dependencies.  Set up the Matchlines and add the View References.

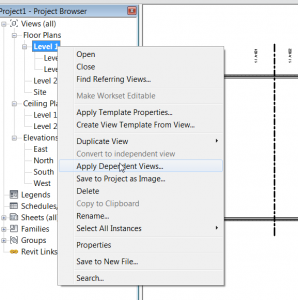
Once that is set up in the Project Browser right click on the parent view,  select “Apply Dependent Views…”


…it will bring up the Select Views dialog box, here you can select the views that need dependencies.  (NOTE: it will only display views of the same scale).  The only thing left to do is rename all the duplicated views, if you use scope boxes and view templates apply them accordingly.


Revit Basics – User Interface

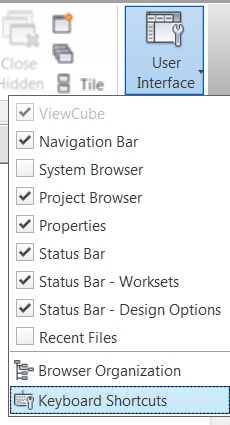
During every training session this question comes up multiple times.  “How do I get my Project Browser (or Pr0perties, or Zoom dialog thingy) back on the screen.  If you accidentally turn off any of these they are easily brought back by going to the View tab >> Windows Panel >> User interface drop down and rechecking what you want back on.  You at anytime can bring back the Recent Files screen that is shown when you open Revit with this as well.

Show only Core of walls

For many years I have been asked the question “Is there a way in Revit to only show the core of the wall?”.  Recently this question came up yet again during a session of Revit Radio, but this time it came up right after an example with parts.  So this got me thinking could we break up a wall into parts and then use filters to somehow turn off those parts.  Ironically at the same time Dezi was working on a similar situation to only show the core of the  Architects walls through a linked model.  So we sat down and worked on this together and came up with a solution, YES you can only show the core.  Finally the answer everyone has wanted to hear to this question over the years.

The first step to this procedure is to send Dezi and I some nice bottles of wine as a thank you….  Ok just joking I am writing this while high in the mountains of Alma Colorado while having a nice evening and running out of drinks and not wanting to drive into town to get more…

The real first step is to select the walls and select the Create Parts button.  This will divide the layers of the wall into individual parts.  It will also set your view properties  “Parts Visibility” to Show Parts.

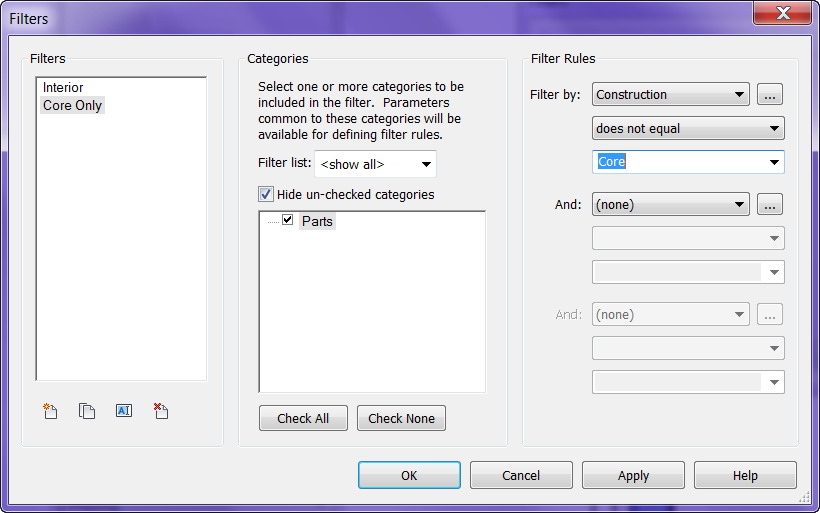
The next step is to create a filter so that the other parts of the wall can be hidden. On the View tab, Graphics panel, select the Filters button.  Name the filter, assign it to Parts for the category, set the Rules to be Construction >> does not equal >> Core.

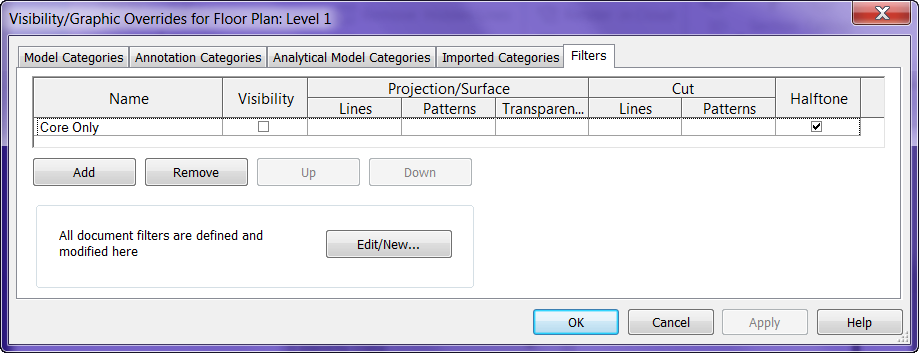
Add this filter to your view via the Visibility Graphics >> Filters tab and un-check visibility

It could also be filtered by materials or whatever else is needed, I just used Construction property for this post.  Dezi also found out that this will work nicely through linked files to turn off certain parts of the Architects wall for her Structural model.

If you want to display all the layers of the wall you don’t have to edit the Filters again just change the “Parts Visibility” property to “Show Original”

Of course there are limitations to this system; the lack of stability with parts in the 2012 release,  join conditions can be funky, some walls can’t have parts applied to them period.  So when I say yes we can use this to display only the core I guess it will depend on the stability of parts and wall joins.  Just a thought for everyone to try let me know how well it works for your conditions.

SketchBook Express update 2.4

Autodesk as released an update for SketchBook Express.  I guess the last update caused a bug so this got fixed in the new update

 

What’s New in Version 2.4

✓ Fixed brush performance on new iPad 
For those of you who haven’t downloaded this free app here is a description of what it does (Per the app store).

Autodesk SketchBook® Express for iPad is a fun and intuitive drawing application. Get a taste of the SketchBook Pro experience with SketchBook Express.

Use professional-grade tools and brushes to create doodles, quick sketches or artwork on-the-go.

Features:

✓ Full Screen work space with support for any device orientation ✓ Canvas size: 1024 x 768

✓Multi-Touch Interface: • Two finger pan & zoom navigation with 2500% zoom • Three finger tap for controls • Three finger swipe gestures for quick access

✓High Quality Brushes and Tools: • Professional-grade paint engine delivers smooth and precise brush strokes •15 preset brushes, including pencils, pens, markers and Fill Tool •SketchBook Store to purchase brush packs and a selection of Pro features. • Draw styles for creating straight lines, rectangles, and circles • 10 levels of undo and redo (Quick Access: three finger swipe left and right) • Dynamic symmetric drawing

✓Layers: • 3 Layers allowing easy build up of a drawing • Import layers from Photo Library • Duplicate, Merge and Reorder Layers • Move, scale, and rotate layers interactively using Multi-Touch • Toggle visibility and adjust Layer Opacity

✓Text: • Create text with a variety of fonts, colors, sizes and placement.

✓Colors: • Color Wheel with HSB and RBG color space • Eye-dropper color selection

✓Gallery: • Store and view work in progress • Export to Photo Library • Browse images in full-screen mode

✓ iCloud Support ∙ Option to set iCloud as default location to save canvases ∙ Controls in Gallery to upload or download from iCloud

✓Stay Connected: • Built-in SketchBook News panel for live info about Sketching events and announcements

✓ Visual help pages


For those of you using SketchBook Pro keep looking out for SketchBook INK coming out this spring.

Rotate with Origin

I was asked the other day by a user, a frustrated user, how come you can’t go right into the rotate command and place the center rotation point?  Well you can easily do this with a keyboard shortcut by default the keys are R3, if you want to change the default the command name in the Keyboard Shortcuts (KS) the command name is “Define a new center of rotation”.