Tag Archives: Undocumented Feature

Revit 2016 Content

With every release of Revit I always use Beyond Compare to compare if/how the families vary from release to release.  This year in the US Imperial Folder (C:\ProgramData\Autodesk\RVT 2016\Libraries) I noticed that there is new organization along with new families for doors.  In 2015 there were 32 families and in 2016 there are 92 families, some of which are hardware families.  I haven’t had the chance to go through and look at these but a long overdue addition for all the architectural users who haven’t developed their own internal library yet.

For structure they have added the AISC 14.1 families that were a subscription bonus last year.  Along with this they have added a few structural tags to go along with some of the new features.

I was however disappointed that they didn’t add or change any of the tags that take advantage of the elevation of floors, roofs etc.

Loaded Tags

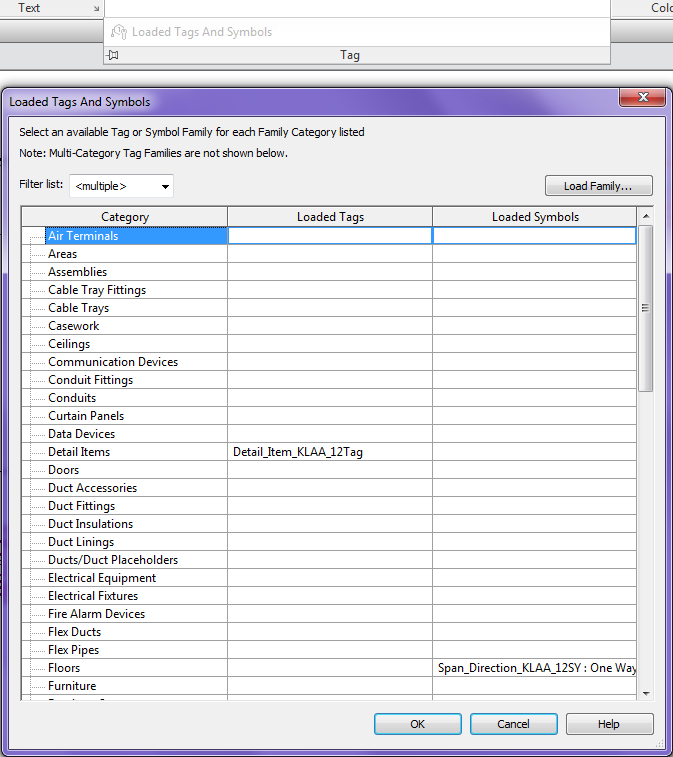
Today I noticed a small feature that either I didn’t notice in the what’s new documentation, ok maybe I just missed it.  In Revit 2015 (currently using update 5) the Loaded Tags command has been replaced with the Loaded Tags and Symbols command.  It is nice to finally be able to set up what symbol will be used for those categories that use them, (i.e.: floor span direction, Structural Path Symbols, Structural Fabric Symbols).  This is documented in the Revit 2015 Help file.

Revit Help

Revit_Loaded_Tags_Symbols

Revision tags rotate with component

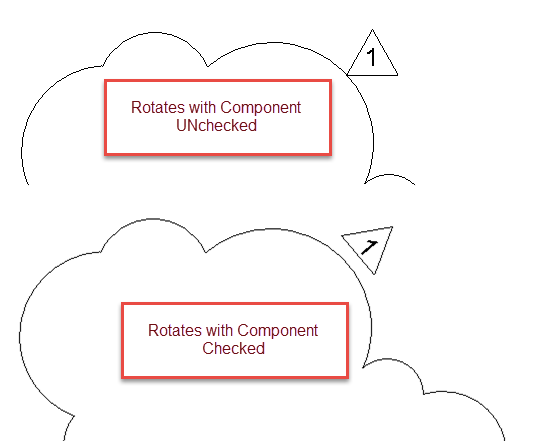
The other day while in training I found a subtle nuance to revision tags. If rotate with component is checked then the tag rotates with the curve of each bubble.  I know this option only works with draw type elements such as walls, beams, footings etc. (See Steve’s posts older, newer). I thought this was new to 2015 but found out it goes back a few releases. I am not sure why a firm would want the tags to be printed at varying angles but this option is available.

RotatesWithComponent

Vertical Face Based Template

I had mentioned this tip to a bunch of speakers at the BIM Workshops and they had never heard of this so I figured it should be a post, especially since one of them came up and gave me a kiss on the cheek.

When creating face based families the biggest complaint I hear is the fact that if the element is going to be placed on a vertical face, in the family the front is the plan view.  I agree this can be confusing, so why not create a vertical face based template instead of using the OOTB horizontal face based template.  Impossible you might think, well up until a year ago I thought so too, until  I learned about a workaround on changing a wall, ceiling or floor based family to a face based family from our local user group (RoMBIS).  Note you will have to have Revit MEP or Revit for this tip to work, if you have Revit Architecture or Revit Structure then you will have to download my version.  The thing I noticed when using this tool is that if I converted a Wall Based element then the surface it uses as the face is vertical.  This is when I decided to use these steps to create my own Vertical face based family.  I haven’t tried but I am sure the same thing could be achieved for an upside down face if a ceiling hosted family was converted.  However I will save all my readers the headache and post the file for download for everyone to use.

FaceBasedVertical

Here is the BD Mackey Face Based Vertical Template, there is an additional reference plane “Actual Face” as well as a parameter “Offset from Surface”, as I always build in a face offset for my hosted families.


Stacked Walls and Design Options

A client was having an issue working with design options and stacked walls the other day.  When the stacked wall was selected it wouldn’t allow it to become part of a design option.  I started an new file and had the same issue as he was having, however when I went to do it again for this post the issue didn’t happen again, then I realized it had been changed in Revit 2013.  I thought I should post it anyway in case this issue does happen for others still using 2012.

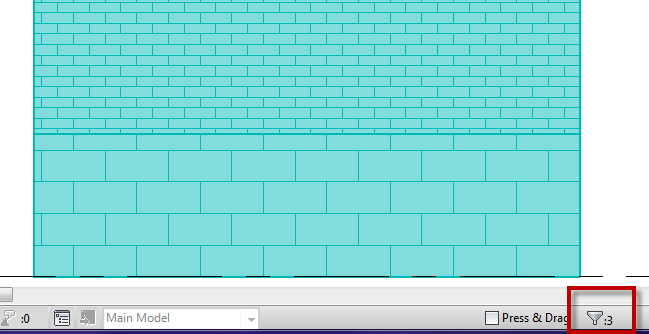
As with any element if the host is going to be apart of the design option then anything hosted to it must be part of that same option.  For instance all doors and windows hosted in a wall must be part of the same design option the wall is in.  Stacked walls are the same, each wall type that make up the stacked wall are hosted to the stacked wall (at least we will say that for this situation), so the stacked wall and all of the individual wall types that make up the stack must be selected in order to become part of a design option.  For this to happen the “Tab” key will need to be used to select the individual wall types.

In Revit 2013 they improved on the entire selection process for adding elements to design options.  Most notably if you select a host element now everything associated with that element will become part of the design option.  No longer do we have to select all the doors, windows, etc they just go.  HUGE improvement for working with design options in my opinion.