Tag Archives: Tips

Adaptive Component – Everyday Uses part 2

continued from Adaptive Component – Everyday Uses part 1

Creating the Family Rig

Adaptive families consist of elements, most of which are different than the normal family environment.  These elements will include: reference points, adaptive points, shape handle points, reference lines, surfaces and solids, all of which will be discussed in further sections.

Points

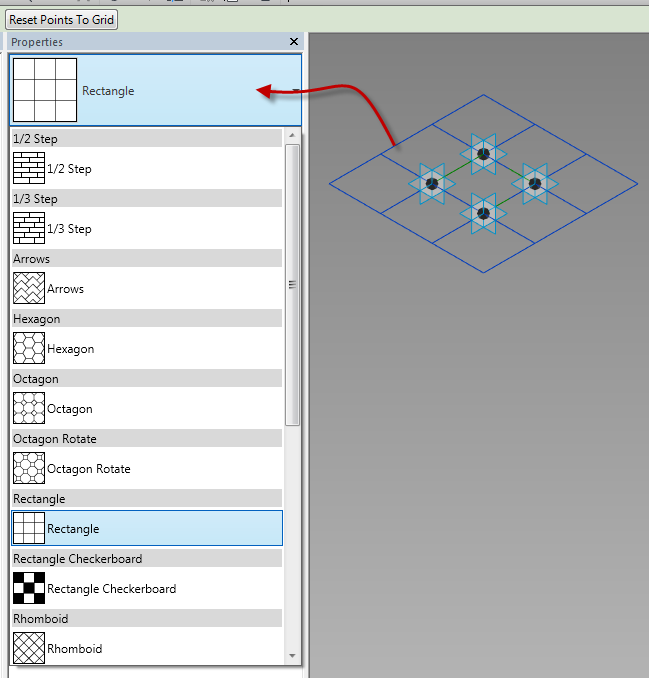
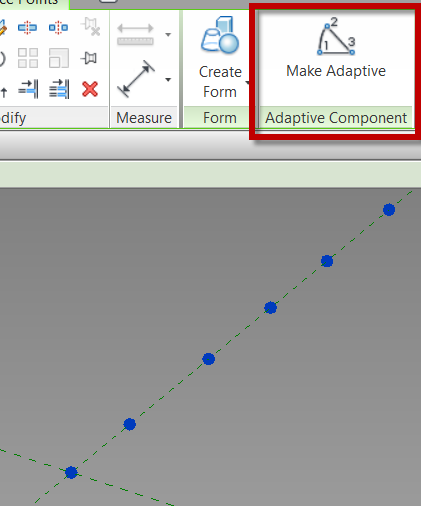
Adaptive families use adaptive points, however there isn’t an adaptive point drawing tool.  In order to create adaptive points, reference points must be placed and then made adaptive.

To create an adaptive point simply place a reference point, select the recently placed point(s) on screen and choose the Make Adaptive button on the contextual ribbon.  Alternatively, a point can be selected and this value can be changed in the properties dialog.

Adaptive_Points

Adaptive_Points_Numbered


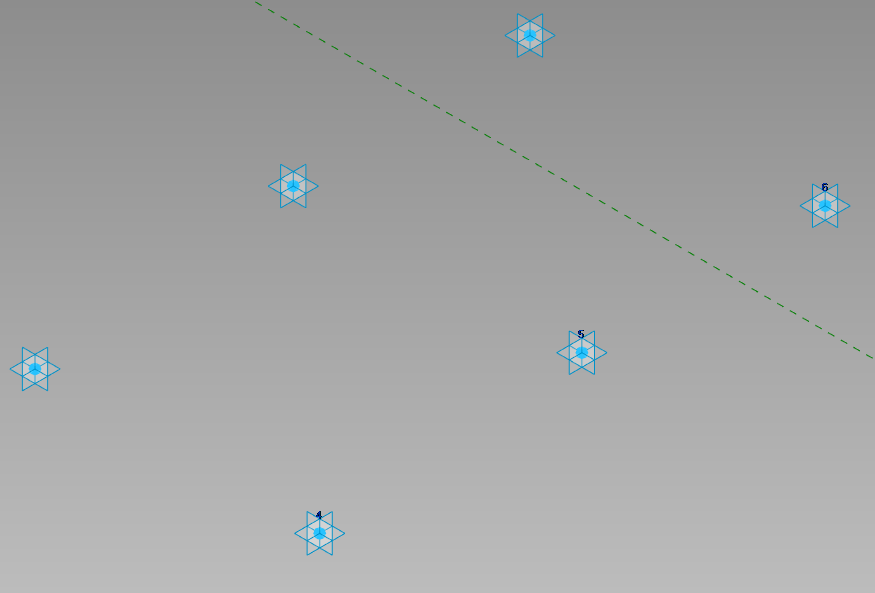
Once points are made adaptive, the local x, y, and z planes of each point will become visible.  These planes are then all available to be used as references.  The adaptive point numbers will also be displayed in the order in which they were created.  If the numbers need to change, select the number above the point and change the value.

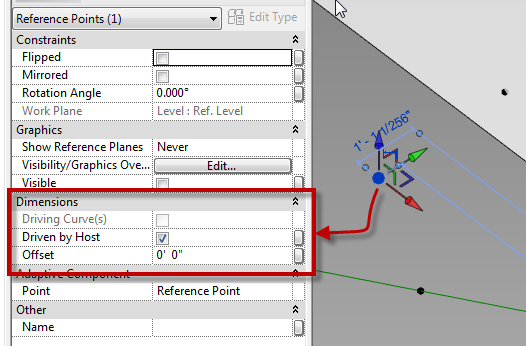
Reference points are a different type of point.  Reference points are usually hosted on another object – a reference line, adaptive point, or another reference point.  Reference points also have work planes that can be used to assist in the modeling process, although they are not displayed by default.  If it is the desire to display the work planes, this can be adjusted in the properties on a point by point basis.  Points will also vary in size on the screen based on whether or not the point is hosted.

Driving points are points that control the nodes of a spline or arc.  They can be recognized by their value of Drives Curve(s) in the properties.

Lines, Splines, Arcs and Circles

In the massing and adaptive family environment there are 2 types of lines that can be created, reference lines and model lines.  Both of these elements are created the in the same manner and work in similar ways, however there are a few subtle differences between them.  Model lines do not have any work planes associated to them, however they can host points.  Model lines get absorbed into the surface or solid they were used to create.  Reference lines have four work planes, one on each end, and one in the X and Y direction.  Any curved reference line (i.e. splines, circles and arcs) only have work planes associated with the end points.  Unlike model lines, reference lines remain when used to create solids or surfaces.  These line types can easily be changed from reference to model by simply checking the “Is Reference Line” in the properties dialog.

Splines and Lines by Points

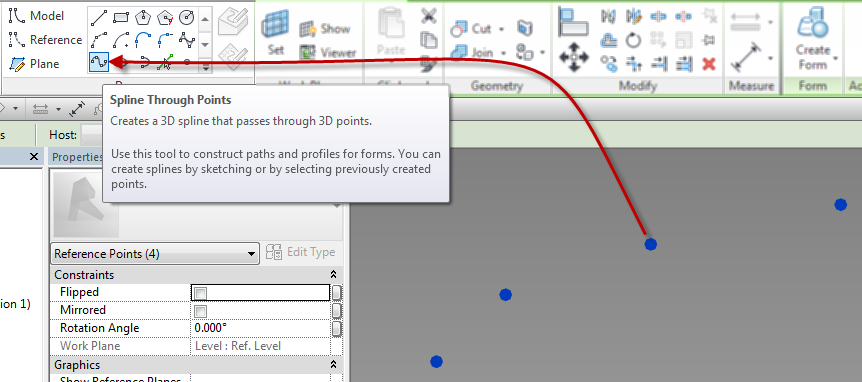
When creating lines and splines, there is an option to create both of them directly by clicking on the screen, however both of these can also be created by selecting previously created points.

  • For splines this can be accomplished two ways, either select the spline by points tool and click on the screen for the spline vertices, or select already drawn points and then click the spline by points tool. If the spline is created by selecting points, it will always create a model line; if a reference line is the goal, change the value in the properties of the line.
  • SplineThroughPoints
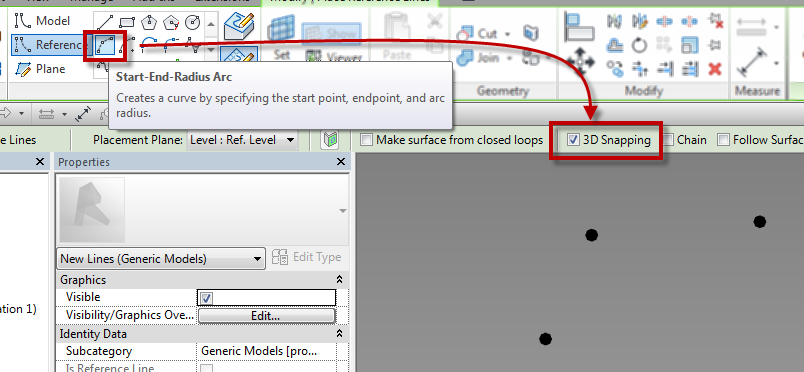
  • The capability to draw an arc through points is a relatively new feature. This tool only allows for the arc to be drawn on screen from previously created points. In order for this tool to work properly, the 3D snapping check box must be enabled prior to picking the points that are going to create the arc.
  • ArcThroughPoints

Hosted Points

By default, when reference points are placed they are hosted on an element, which can be a level, plane, line, or surface.  Properties will vary depending on which element is the host.

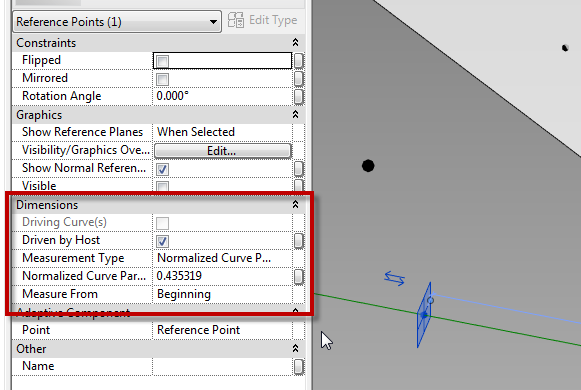
  • Points hosted on a line will have “Measurement Type” as a property.
  • HostedPoint_Line
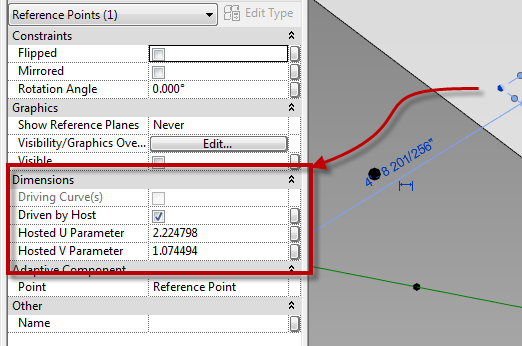
  • Points hosted on a surface will have “Hosted U & V Parameter” as a property
  • HostedPoint_Surface
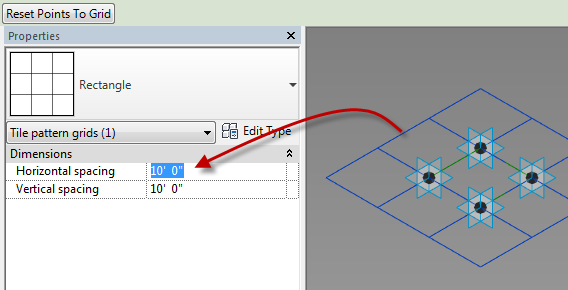
  • Points hosted on a reference plane, reference level or another point will have “Offset” as a property
  • HostedPoint_ReferencePlane

Knowing these values and how to take advantage of them will become critical when working with adaptive families.  All of the above properties can have associated parameters to help further the development of the family.  Points hosted on lines have the value of “Measurement Type” which also has additional options that need to be considered, and these options will vary depending on if the point is hosted on a straight or curved line.

  • Non-Normalized Curve Parameter = Radians when on an arc or circle (not useful when using straight lines)
  • Normalized Curve Parameter = ratio of the arc length of the arc or line from 0.0 to 1.0
  • Segment Length = Length of the point from either the beginning or end
  • Normalized Segment Length = Ratio of the length of the line from 0.0 to 1.0 (same as normalized  curve parameter for lines and arcs different for splines)
  • Chord Length = Direct distance from the begging of the line, arc, or spline to the point
  • Angle = Angle from the beginning of the arc or circle to the point (arcs and circles only)


Adaptive Component – Everyday Uses part 1

This past year was a good one and I had the privilege to speak at several conferences and one of the most popular topics was adaptive components (my sessions were titled Everyday Uses of Adaptive Components). I thought I should share some of the process and families that I had presented.  This is going to be a series of posts discussing the process of adaptive components, their advantages and pitfalls as well as a tutorial on how to create a few.

Family Template Types

When starting an adaptive family, the first step is to understand what templates are available and decide which template is the most appropriate for the task at hand.  There are three templates that provide a starting place for an adaptive family: Curtain Panel Pattern Based.rft, Generic Model Adaptive.rft, and Generic Model Pattern Based.rft.  Even though the curtain panel pattern based family sounds like it can only be used on a divided surface of a mass, etc, it can actually be used similarly to a normal adaptive family.  Additionally, starting from the Curtain Panel Pattern Based template, and then changing the category to generic model would produce the same result as starting with the generic model pattern based family.

Generic Model Pattern Based / Curtain Panel Pattern Based

When starting with one of the pattern passed templates, there is a grid system (tile pattern), along with 4 points on that system, and reference lines connecting those points.  Unlike many family templates, these points, grids and lines are not static and can be adjusted.  To change the tile pattern and the amount of adaptive points, select the grid system (must be done by selecting the outside of the grid), and in the type selector, change the grid tile pattern type.  Depending on which tile pattern is chosen, the quantity of adaptive points may adjust along with the grid system.

TilePattern_TypeSelector

Note: To flex the family select the grid system and change the spacing in the instance properties

TilePattern_Properties

This type of template is ideal for creating a shape or panel that needs a specific quantity of points.  The downside to using this template type is that additional adaptive points can’t be added, the adaptive points can’t be re-ordered, and there can never be shape handle points in the family.

Generic Model Adaptive

This template is the most flexible type, but it also starts from basically a blank slate – only a couple of reference planes.  This means everything has to be created from scratch, starting with adding adaptive points and reference lines. This template type does allow for an infinite amount of adaptive points, as well as the flexibility to re-order the adaptive points at will and to add shape handle points.  This template type will allow for levels to be generated, but the levels DO NOT transfer to the project or massing environment; basically they simply act as horizontal reference planes.

GenericModelAdaptive

Note:  The Generic Model Adaptive looks extremely similar to the massing template, however adaptive points can’t be created in the massing environment.


Up next Adaptive Component – Everyday Uses Part 2

Revit Basics – Group Origin Points

I am not a big fan of groups I tend to think they get over used in lieu of families, but this post isn’t going to get into that.  With that said there is a time and place for their use and when they are being used I think there are a couple of tips that I see commonly overlooked.  The simplest tip to discuss is the groups origin point.  When a group is created it will place a symbol in the center of the objects being grouped, this symbol is the origin point.  This symbol is used not only for the origin point when placing the group but also as the origin when the group is being changed from one type to another.  To adjust where this is located simply select the group and drag the symbol to a location that is better than the random center(ish) area of the group.  This way placement of the group is easier as well maintaining it’s placement when the group type is changed.

Group_InsertionPoint

In the image above a group was created for alignment of several schedules onto sheets, the “Group Origin” was moves such that is could easily be snapped to the title block.

Another tip is the fact that groups can be changed just liked any family.  If a group is selected it can the be changed via the “Type Selector” just like any family.  This is why it is important to pay attention to the “Group Origin” as stated above.

Group_TypeSelector

Last tip for the day is if you are only using a group one time consider ungrouping it and purging the group out of the model.  It is a known fact that groups will slow Revit down especially when they are over used.

Spot Slope Revit

While helping set up a template with a client there was a discussion on how the graphic should look for the spot slope symbol, hence this post.

While  placing a spot slope there is an option to change the graphic representation to be either Arrow or a Leader.  However this option is not available in a plan, only vertical views such as sections.  This can also be done after placement in the properties dialog.

SpotSlopeTriangle

The type properties for spot slopes also allow for more options and variations on the display as well as the units:

  • Slope Direction allows for the slope to point down or up, however if the triangle option is used then it just changes the insertion point
  • Leader line Length changes the length of both the arrow and the triangle option
  • Similar to other dimension types the units format can be changed.  With slopes some firms like to display roof slopes with a Ratio/12 while displaying sloping floors with a ration or percentage.  By duplicating the slope type all of these options can be available.
  • Using alternate units will allow for Ratio as well as percentage or whatever combination in needed

SpotSlopeProperties

Sizing Reference Planes

I was doing some work with The Ant Group doing some detail work when Jim Balding (JB) mentioned a tip that I can’t believe I hadn’t been using for years.  When I create family content I am very specific about making sure the reference planes aren’t longer than needed, centered in the family etc., especially when working with detail components or generic annotations and tags.  I have family templates for most family types, my detailing template has been set such that the reference planes are centered, equal length and around 4″ (100mm) in length.  When I start a family from this template on of the first things I do is unpin the reference planes and stretch each end to the desired length for that component.  JB asked why I didn’t use the scale command?  He showed how he uses scale by selecting the reference plane(s) and scaling it from the center point, clicking the end then clicking again at the desired final length.  This really is a great tip when both of the reference planes need to be sized equally.