Tag Archives: Tips

Purging Unused Views – Sheets

Last year at RTC and AU I spoke on schedules and thought it would be a good time to mention one of the schedules that I spoke about.  For any of you who know me or have talked to me about Revit know that I love schedules.  After the modeling is done I spend just as much time, if not more, in schedules making modifications instead of in the model.  Two of my favorite schedules that I pretty much add to anyone firms templates are ones that allow me delete unused views.  I also use have some to delete all views and sheets prior to posting for consultants.  These schedules are easily created and added to the template.

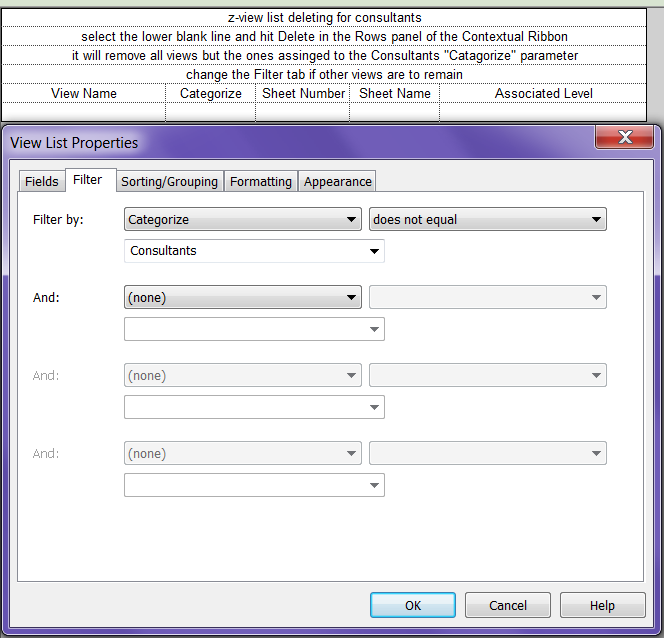
Most of my firms have added a parameter “View Category” or something to sort the views in the project browser.  I take advantage of this parameter when deleting views.  Create a schedule include the parameters you want but at least include the “View Category” parameter.  Use this parameter in the Filter tab so that it will leave out any view that does not want to be deleted.  Just like that all views have been removed so your consultants can have a much smaller file size to link into their model.

Then use the Sorting and Grouping tab don’t sort by anything and un-check “Itemize every instance”.  This will sort all the of the views to one single line, now all you have to do is select the one line and select Delete in the Modify View List contextual ribbon.

Waffle Slab

I have been asked many times about the best way to model a waffle slab in Revit.  There are many different ways to go about it; I will discuss a few of them. 

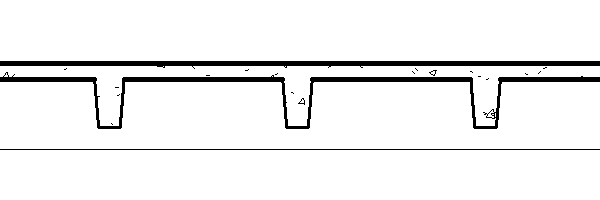
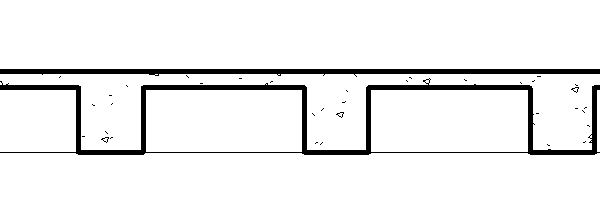
Beams and Floor:  I personally like to model a waffle slab with a floor that is the top thickness and then just draw in the beams for the waffle part.  Either using a rectangular beam or a Pan Joist depending on the construction of the waffle.  I like this method due to the fact that it has the fewest faces modeled in the project.  Each beam will have 6 faces and the slab 6 faces, which is the easiest for Revit to process.


Floor with Holes and Floor:  A lot of users will model one floor that is the thickness of the waffle portion of the slab with holes sketched for the waffles, then model another floor on top of it the solid thickness.  Once both of the the slabs are modeled they will have to be joined together  This method works well if the waffle slab has a varying pattern, but can only have vertical waffles.  The downside to this method is for every opening in the slab there will be 4 additional faces, there for creating more information for Revit to process.

Floor with Custom Void Family:  Lastly, one could create a custom family that is floor based and contains a void.  Change the shape and size of the family(ies) once loaded and place them where needed.  This option is the most flexible and will allow the waffle to do have any shape, however it also creates the most faces.  The voide will have 6 faces which will cut the floor creating 5 addtional faces.  So there will be 11 faces at each waffle taking additional processing power.

Either way you choose here are a few of the options that I have seen used in the industry.

Center Mark Visible

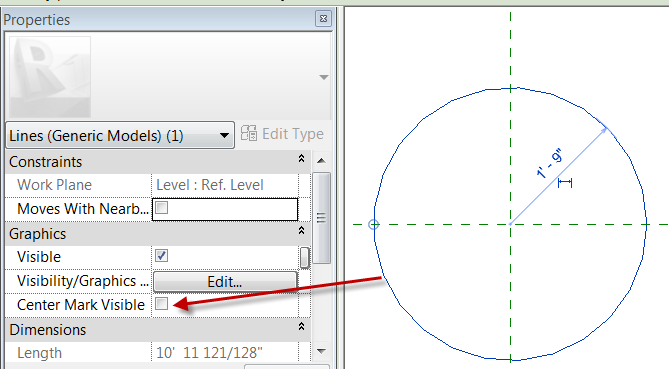
While creating some families this week I made a note to show a simple feature of circles that is extremely beneficial yet easily missed.  When using a circle in a parametric mass the circle may need to move with other items this can be accomplished by turning on the Center Mark Visible parameter. Selct an already drawn circle and in the properties check the “Center Mark Visible” option.


This will allow the align command to be used so that the center of the circle can now be locked to the Reference Planes or Lines.

Model Lines for Hosts

I had a structural client ask me this week the best way to model a wall foundation if the walls were being modeled by the Architect.  I had two suggestions one of which made me think of this post.  In this case we can use slab edges, but instead of hosting them to a slab they can be hosted to model lines.  I have used this tip many times since slab edged can’t be hosted to the sloped side of a slab but they can be hosted to sloping lines. Oh the added bonus is that they can also be hosted to curved lines in elevation.  Slab edge hosted to model lines shown below in elevation.

I also wanted to point out that Roof Fascias and gutters can be hosted to model lines as well.  Although gutters can only host to flat and not sloping or curved lines.

I have used this trick to do more than the intention.  Since all of these tools are just profiles being swept along a path the profile can be anything you want; for example curbs, gutters and sidewalks in a parking lot.  Now this isn’t going to follow topography but it does work well for schematic.


Dimension Home

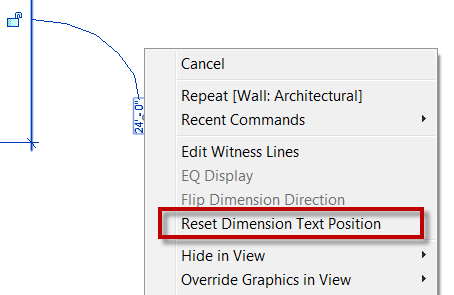
I am almost embarrassed to say that I didn’t know this feature existed and I just found it.  Naturally when I find a nice little feature like this I go back to previous releases to see how long I have been not utilizing it.  Thankfully I found out it was new to Revit 2012, so I didn’t feel as bad.  If you have taken the text from a dimension and moved it off to the side, either to get a leader or just to move it, and then wanted it to go back to it’s default location there is a new way to do this in Revit 2012 (yes in 2013 too).  Simply Right Click on the text that has been moved and select Reset Dimension Text Position.


Whenever I find an undocumented feature like this it always makes me wonder what other ones am I missing.  If you know of any please pass on the knowledge.