Revit 2017.1 C4R Changes

Yesterday Autodesk released the latest update for Revit 2017 (direct download links can be found at Luke’s Blog).  A couple of changes have happened if you are using Collaboration for Revit.

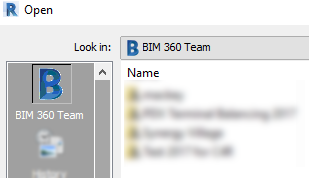
One of which is the new branding from A360 to BIM360.  In the Open dialog box the icon has changed. (this is also true when SP7 for Revit 2016 is installed as well)

2017-1_c4r_open

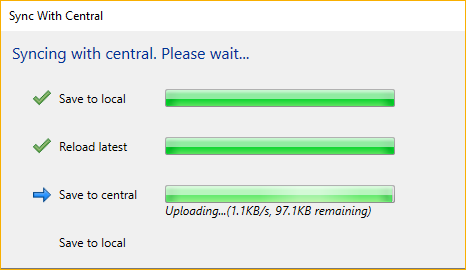
The more significant change is the Synchronization process, below we can see the status of the process in a dialog box (wish this was there for normal projects as well)

2017-1_c4r_synch

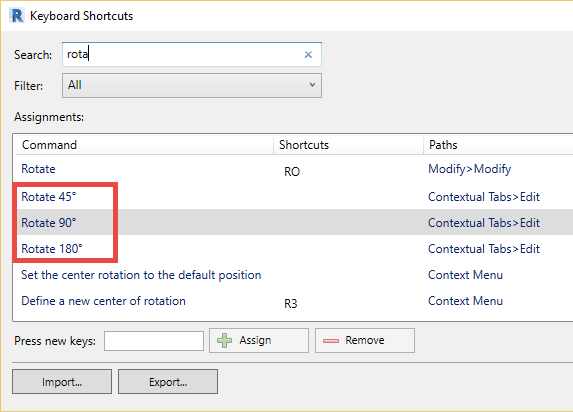
Two changes I have noticed with in a few minutes of using the updated version

Revit 2017 Ceiling Change

In previous releases of Revit we have been able to automatically place ceilings in rooms in most instances.  In 2017 the reasons for not being able to place rooms automatically have changed.  In my opinion this should be considered a bug.

The situation I am referring to is when we have a room that has a wall protruding into it, (see image below).  Prior to Revit 2017 a ceiling would go into this room with out any problem.  Now in 2017 you will have to manually place the ceiling using sketch lines.

2017-ceiling-bug

Thin Lines Bluebeam

For those of us that are Revit users we are very familiar with the “Thin Lines” button.  This disables the line weights and displays all lines with out any thickness.  What I stumbled upon today was the ability to so the same in Bluebeam, assuming the .pdf is generated from a program like Revit, AutoCAD, Microstation etc.  The tool in Bluebeam is called “Disable Line Weights”, it isn’t upfront and center and unless you try to customize the interface you may never find the tool.  To activate this command  either Right Click on a toolbar or go to the View Ribbon tab and hit the arrow next to the Toolbars icon

bluebeam_toolbars_customize

Once in the Customize Toolbar dialog box:

  1. Change the Categories: to All
  2. Scroll down to select “Disable Line Weights”
  3. Select the toolbar to add the command too
  4. Click the “Add Command” button

bluebeam_toolbars_dialog

You now have the command available on that toolbar.  Use these steps to discover other tools you may not have know existed.

Ironically found this when trying to find the keyboard shortcuts, which by the way can easily be found in the help.

bluebeam_keyboardshortcuts

Revit Keyboard Shortcuts

When a new release of Revit comes out there are a few things I check into. One of those things are keyboard shortcuts to see if their are any new tools that may have not been documented. While in Revit 2017 I noticed there is a new set of Rotate shortcuts (they were there in 2016, I must have missed them): Rotate 45, Rotate 90, Rotate 180

Revit 2017 Keyboard Shortcuts Rotate

Of course upon seeing this I wanted to test it in the project environment, I did however notice that it was a “Contextual Tab” tool, which means this is a command that is only used when a given object is selected and not part of the Rotate Command.  I decided to see if I could find it in the Help  upon which I was reminded about a link in the Help files that I forgot was there.  Autodesk has been nice enough to supply a download of all the keyboard shortcuts, both in an Excel form as well as PDF form.

Revit 2017 Keyboard Shortcuts Help

When looking at either of the files you will notice a column displaying the Command ID, which will show us what the command is associated too.

Revit 2017 Keyboard Shortcuts Excel

After looking at this it was obvious that the was released as part of the MEP Fabrication assembly features.  Hopefully the fact that I re-found the Keyboard Shortcut Excel file will help others.

Revit Update Locations

I think most users out there will agree with Steve and most of his post about the Autodesk Desktop App (formerly Autodesk Application Manager), I know I do, on how hard it is to find the updates when they are released.  Yes most of us rely on Luke to post a direct download link to find this information.  However I will show you the place where you can go to download the files as well.

If you have an account with subscription, (really can we even buy software not on subscription) then you will have a http://manage.autodesk.com account.  If you are not the contract admin person on your companies Autodesk account then you may not have many options here, I am assuming most users reading this post are in charge of the updates for their company or individuals who own software.  The contract admin can allow users to obtain downloads, if they have not then you may not see all the options.  Once you log in then you will see a list of all software associated to your account.  If you expand the desired software you will see Updates & Add-Ons.

ManageAutodeskProducts

Once Updates & Add-Ons is selected you will see a list of all the updates for that software (in the case of a Design Suite you will see updates for all software as part of the Suite).  Make a note of the “Add Filters” button as this will allow you to dive down specifically to the year or product needed (Note: Collaboration for Revit is not part of the Revit products when a filter is applied)

ManageAutodeskProducts_Updates