Tag Archives: Basics

Revit Basics – Orient to View

This is an excerpt from an article that I wrote for AUGIWorld.

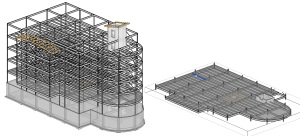
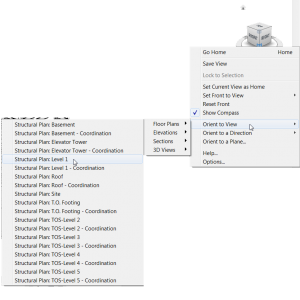
Models routinely become large or complex over the life of a project, and consequently a Revit user will occasionally want to isolate, in 3D, a certain area of the model or a particular group of elements.  The novice Revit user will then begin the tedious task of hiding elements to achieve the desired view.  Of course numerous options are available to quicken this process, such as toggling the visibility of different categories of elements, temporarily hiding/isolating elements in view, applying ghosted settings, manually adjusting section boxes, and perhaps even filters and/or worksets. This approach will eventually work; however, the task of isolating a particular section of a model can be quickly achieved by using the Orient to View command, which is found by right-clicking on the View Cube, shown in the first image.  The second image shows a floor that has been isolated via the Orient to View command.

The way this command works is to adjust the section box such that it mimics the view range and the crop region of the selected view.  To return to seeing the entire 3D model, either turn off the section box in the view properties, or manually stretch it back.

Revit Basics – Create Similar

This is an excerpt from an article that I wrote for AUGIWorld.

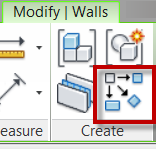
Until Revit 2010, the only easily accessible location to activate the Create Similar command was in the right-click context menu after a single element is selected. Revit beginners probably didn’t even know the command existed.  Create Similar is now available on the Modify Tab, but remains grayed out until a single element is selected.  The inquisitive Revit novice may have discovered this command’s function by hovering over it and reading the tooltip, but others may not have noticed it and don’t know it exists.

The Create Similar command activates whatever command is necessary to create a new instance to match the type of an existing element.  For example, selecting a wall and clicking Create Similar activates the wall command and sets the type of the wall to match the one selected;then the user maydraw another wall instance.  This command is particularly useful for several reasons.  It matches an element’s type without the user having to know that type, and without having to navigate through the (occasionally long) Type Selector looking for something specific.  One may just copy elements to achieve a similar outcome, but then the user is left modifying, moving and altering the new instance after it is placed.  Also note that copying will not only copy the desired element, but also any hosted elements, i.e, copying a wall will also copy all of the doors and windows in that wall.  While extremely useful, the Create Similar command is not without its flaws.  It only matches type properties, not instance properties – or at least not all instance properties – so, for example, it will create a wall of the same type, but not of the same height.  Strangely, however, it will match location line settings, which is an instance property.

Revit Basics – Tab

This is an excerpt from an article that I wrote for AUGIWorld.

“Press tab” is likely one of the phrases beginner Reviteers get tired of hearing.  It is common knowledge that the tab button can be used to cycle through elements to enable the selection of a specific element in a congested area.  What is lesser known, or at least lesser-used, is that pressing shift + tab will cycle through the elements in the opposite direction.  Knowing this small item would prevent this very familiar occurrence: “Tab, tab, tab, tab, tab, shoot! I skipped the element I wanted….tab, tab, tab, tab….”

Just in case it has not been said enough, the following is a list of some of the useful applications for the tab button: cycle through elements in a congested area; instead of just one segment, select a chain of walls or lines; select only a segment of chain of walls (select the first one and then press tab while hovering over the last desired segment); instead of one at a time, select connected beams all at once; cycle through snap locations (end point, intersection, etc.); get to objects in a linked file to see the properties.

Revit Basics – The Spacebar

This is an excerpt from an article that I wrote for AUGIWorld.

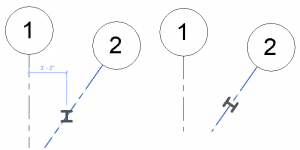
In my article I called this section “The Magical Spacebar”. No, inserting spaces between words in text is not the magical function of the spacebar.  When inserting a component, new users tend to place the component somewhere in their workspace and then will alter said component to their liking.  These alterations often include rotating the element.  What the beginner doesn’t know – and often takes a long time to learn – is that hitting the spacebar before placing the component will rotate it.  Furthermore, if hovering over another element in the view, the spacebar will cause the component to orient to the same direction. Pressing the spacebar again will then rotate the component 90 degrees from that direction.  Finally, if hovering over an intersection, the element will only rotate 45 degrees instead of 90.

In addition to rotating a component prior to placement, the spacebar can also be used to rotate or to flip elements (or multiple elements) that are already placed.  Using the spacebar to rotate after placing a component can be a little troublesome because the base of the rotation is the insertion point of the component, so rotating in this manner may require more moving and aligning.  The flipping works with any element that has a flip control (the two little blue arrows that appear when an element is selected).  For example, select a wall, or several walls, and use the spacebar to toggle the walls interior/exterior sides.

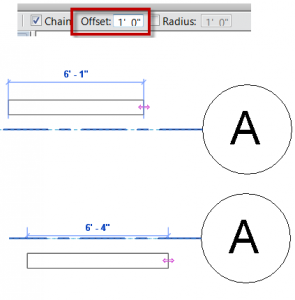
Another application of the spacebar is to use it in conjunction with elements that use the offset option.  While sketching an element with an offset option, the spacebar will toggle the direction of the offset.

Finally, when doing anything – from drawing a line to changing a dimension – the spacebar can also be used in place of the feet and inches symbol.  So, instead of typing 5’4”, for example, simply type 5 4 and the result will be the same.  Using the dash key also works in the same manner as the space bar (5-4), which is useful because the dash is one of the keys on the number pad.  Please note, however, that the dash approach only works between feet and inches; a space is still required between whole and fractional inches, i.e. 5-4 ½ works, but 5-4-1/2 does not.

Revit Basics – Snaps

This is an excerpt from an article that I wrote for AUGIWorld.

If a new Revit user is an AutoCAD veteran, one piece of good news is that the object snaps are greatly similar from one program to the other; it is just a matter learning what snap options are available in Revit, where to find all of them, and when they are particularly useful.  Tutorial literature likely points out the snaps options dialog box, found on the Manage Tab, which provides much useful information.  What a newer user might not know, or might forget to use, are the two-key shortcuts for snaps and the snaps overrides.  To use a particular snap, type its two-key shortcut while drawing an element (the shortcuts are shown in parentheses in the aforementioned dialog box).  For a particularly useful application of the two-key snap shortcuts, try using the snap centers shortcut to rotate about the base point of an element with a very large radius.  To temporarily turn snaps on or off, right click while drawing an element to find the snaps override options.  These tools are well known for users of other programs, but are forgotten when working in Revit.