Category Archives: Navisworks

Navisworks Posts

Revit Update Locations

I think most users out there will agree with Steve and most of his post about the Autodesk Desktop App (formerly Autodesk Application Manager), I know I do, on how hard it is to find the updates when they are released.  Yes most of us rely on Luke to post a direct download link to find this information.  However I will show you the place where you can go to download the files as well.

If you have an account with subscription, (really can we even buy software not on subscription) then you will have a http://manage.autodesk.com account.  If you are not the contract admin person on your companies Autodesk account then you may not have many options here, I am assuming most users reading this post are in charge of the updates for their company or individuals who own software.  The contract admin can allow users to obtain downloads, if they have not then you may not see all the options.  Once you log in then you will see a list of all software associated to your account.  If you expand the desired software you will see Updates & Add-Ons.

ManageAutodeskProducts

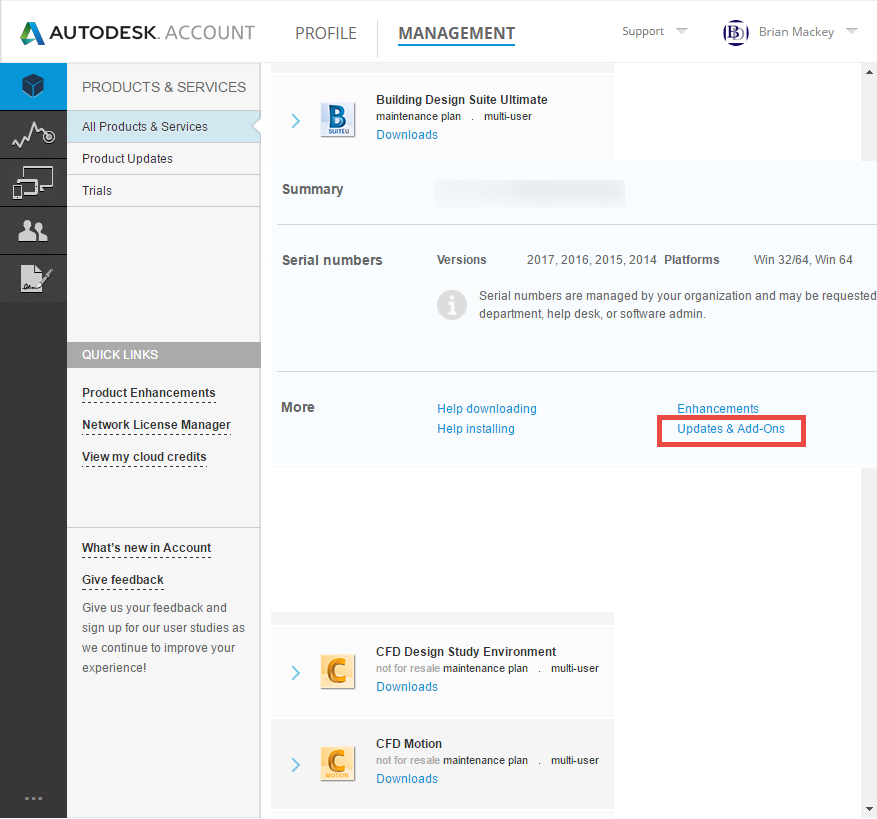
Once Updates & Add-Ons is selected you will see a list of all the updates for that software (in the case of a Design Suite you will see updates for all software as part of the Suite).  Make a note of the “Add Filters” button as this will allow you to dive down specifically to the year or product needed (Note: Collaboration for Revit is not part of the Revit products when a filter is applied)

ManageAutodeskProducts_Updates


Revit Railing Support Bug 2

As I am preparing to teach another session on Revit Railings I noticed another small quirk.  Again in this example I am using railing supports to act as balusters, a great option when dealing with glass panel.

In this image I have a support to look like gasketing material as well as glass supports, these are associated to the U track handrail.  This allows for the glass seam to be unpinned and moved to any desired location.

Railing Support Quirk 01

The quirk arises when the handrail has a value for a fillet radius, even though the Default Join is set to Miter.  If the support is unpinned and moved it will move along the radius as if the value were set to Fillet no Miter.

Railing Support Quirk 02

RTC 2014

My blog has gone dark for a while in case you didn’t know my family was blessed with a beautiful baby girl, aka #BIMbino. I was planning on taking a break for a while and then start blogging again once she started sleeping through the night.  Since this hasn’t happened yet and I don’t envision this happening anytime soon I decided it was time to start up again, however I doubt I will be blogging as often as before the BIMbino.  What better of an excuse to get me started than Revit Technology Conference.

This year at RTC I was privileged to speak in three sessions.  This isn’t the reason I am blogging I also attended some great sessions taught by excellent well known speakers.

One of the sessions I enjoyed was based on Navisworks and quatification taught by Jason Dodds.  This session covered the takeoff tools, creating and importing catalogs.  Jason also did a great job explaining the difference from when these tools were in Autodesk QTO.

Another session was taught by Andy Milburn where he covered mass families where he has developed a few different ways of making rigs to create content.  I personally like his box theory and using an invisible box as a rig platform.

Havard Vasshaug taught a two part lab on computational logic in structure.  Unfortunately I was only able to attend half of this session but what I saw was great.

I got to finish up the conference on the main stage for the redesigned Tips & Trick led by Desiree Mackey.  In the past a they have presented slides based on tips from different sessions taught, this year they decided to a battle of the tips, complete with a gong.  There were two teams myself, Amy Manning and Matt Nelson vs Zack Kron, Scot Brown and Nick Hugley and we had to present some tips from the sessions while being able to add in some of our own.  If the panel, Jim Balding or Wesley Benn decided you were stumbling, didn’t like the tip or just wanted to hear a loud noise they would with the 3 foot (91cm) GONG and you had to move on.  I thought it was a new fun way to present the tips and it did get the audience involved which for me was very fun.  Although we did win some considered bringing two babies on stage was a bit of cheat.

With that said the North American conference was well worth the time and the information one can get from it makes it a must attend event.  I am looking forward to speaking and attending RTC Europe in Dublin over Halloween.


Navisworks opening Revit 2013

In 2013 Navisworks has the capability to open native Revit files.  The question that arises is how does it know what view in Revit to open and what does it import?  They way this is handled is very nice and once understood pretty self explanatory.  In the Navisworks file Reader options there are some settings to pay attention to. 

The Convert setting is used to determine what view Navisworks refers to, to find what to import.   If it is set to First 3D or Navisworks view it will not only look to what is visible but also the level of detail.  If it is set to Entire Project then everything in the file will come through. 

What is the difference between Navisworks view and First 3D view you ask,  if the Revit file has a view with the name “Navis” and Navisworks view is chosen then it will look to that view for what is visible and what the detail level is set to. If it is set to First 3D view it will use the first 3D view that was created in your Revit Project.

I also choose to not select “Convert linked files”  I would rather bring in each linked model file on it’s own.

Steering Wheel Features

While using the steering wheel command in Autodesk products, (I have only tested this with Revit and Navisworks), some of the features have additional options or tools associated with them. For those of you who haven’t used the steering wheel Shift+W will bring it up.


While in the Orbit feature of the steering wheel, the pivot can be changed on the fly by holding the CTRL key down.   Now you can locate the pivot point and then release the CTRL key and continue to orbit the model.

Before using the Zoom feature you can hold the Shift key down and it will take you into zoom window option instead of dynamic zoom.

While using the Look feture you can use the arrow keys to walk through the model, similar to W,A,S,D on first person video games. You can also use the Shift key before look to select a face of an element to focus on to.

With the Rewind tool not only can you see all of the previous zoom levels you were at but you can also fast forward to a position incase you rewound to far.

Last but no least you can also right click on the steering wheel and get a list of options, allowing a user to Fit everything to the window, Level the camera, etc.