Author Archives: Desiree Mackey SE PE

RTC Summary

As you all probably know, we attended Revit Technology Conference, North America, last week, which is why our blog has been pretty quiet lately.  In the week leading up to the event we were putting the finishing touches on our presentations and finishing the content for our demos and labs.  We were looking forward to going to RTC again this year and of course it didn’t disappoint.  Some of the time slots had a few classes that were great, so Brian were often in different sessions (we didn’t even take any of each others classes), and we are still discussing all that we learned now back home in Colorado.

One of the sessions that Brian liked the most was Tim Waldock’s presentation on Divide and Conquer Adaptive components.  This was kind of a follow up session from last year where Tim shared some of the tools that he used to accomplish arrayed families.  This year he showed the new repeat and divide tools, and demonstrated the use of these tools on a current project.

One of the sessions I liked most was Autodesk Project Vasari: Playing with Energetic Super Models with Matt Jezyk.  The class title did not exactly match the session, but I didn’t mind since Matt covered the Dynamo plug in with Vasari.  Seeing Dynamo in action motivated me to learn more about it, and I can’t wait to play with the tool back at my office.

Although many people warned me that they are hard to teach, I really enjoyed teaching my first lab this year and I am already brainstorming for what I can teach in a lab format next year.  I also liked the small group I had for my What’s New in RST 2013 since we were able to skip much of the formalities and we ended up just playing with the software for most of the hour.  My Analytical Software Lecture went well, although it was very fast-paced since I had a ton of content to shove into the time frame.  As always, everyone loved both of Brian’s labs – one on Navisworks and one on managing details on multi-building projects – but we all knew that would be the case since he is such a Revit rock star.  We will see if he and Paul Aubin can break that tie for best speaker rating.

Of course this is a little biased, but a true high-point of the conference was seeing Brian up on the stage during the closing session.  He presented Glorious Gadgets with Jim Balding, which seemed to be a hit with everyone at the conference.  The two of them presented all kinds of cool (and geeky) gadgets, including a flying drone that they sent over the crowd, and the crowd-pleasing beer-fetching robot.

As was the case last year, one of the best parts of the conference is the networking, talking, collaborating and catching-up with all the people we see at RTC.  We hope the conference will always maintain this small, close-knit atmosphere since it is one of the things that sets RTC apart from …those other conferences.

With RTC coming to a close we now we have to wait another year for all of the learning and fun, however we are looking forward to next RTC not being as hot since it will be in Vancouver Canada on July 10-13, 2013.


Detached from Workplane Fix for Beam Systems

I find the “Element will be detached from its associated plane” warning the perhaps second most annoying warning (the beam slightly off axis is the most annoying).

Sometimes there isn’t a good (read quick) way to fix this warning so we just leave it.  Recently I have been working on a project where roof elevations have been changing quite a bit and occasionally the beams in my beam systems will detach themselves from their workplane…they are still in the correct location, but that warning now exists in my project.  I have been fixing this by editing the beam system and clicking “reset system”, which doesn’t change anything I can see, but it quickly reattaches the beams in the system to the workplane that was originally set when the beam system was created.

I thought I would share this in case others could use it.

Select by ID

A few days ago, a coworker asked for a way to locate every instance of a family (in this case it was a detail component family).  His goal was to delete all instances and the usual process of selecting all instances in the project and hitting delete occasionally does not in fact delete all instances so he wanted another way.  He had considered scheduling the instances and then deleting, but not all elements can be scheduled.  This particular issue gave me a chance to suggest one of the useful command that I believe tends to be forgotten.  The following is the procedure I suggested for locating all instances of a given family, regardless of the ultimate goal (deleting, changing or simply finding them all).


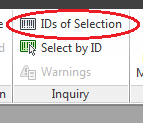
Start by selecting one instance in the project or the family in the project browser, right click and select all instances.  Then, in the Manage tab, select “IDs of Selection”.

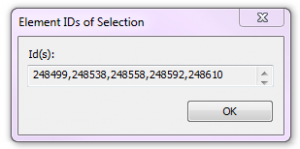
This will bring up a window showing the element IDs of all of the selected elements.

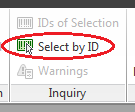
Highlight all of the IDs and copy using Ctrl + C.  Then click OK and go back to the Manage tab and select “Select by ID”.

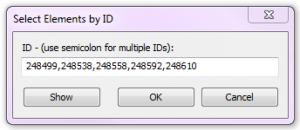
In the window that appears, paste the IDs that were copied to the clipboard using Ctrl + V.

Finally, click Show and the project will cycle through the elements, locating them and showing them.

Side note: if these items are needed for future selections, and you are working in Revit Structure, you can save the selection (also on the Manage tab), or if you are not in Revit Structure, paste the IDs into a text file for future use.

Revit Basics – Temporary Dimensions

This is an excerpt from an article that I wrote for AUGIWorld.

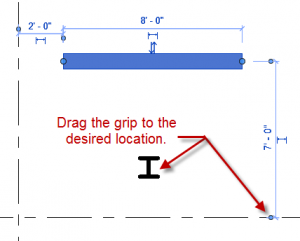
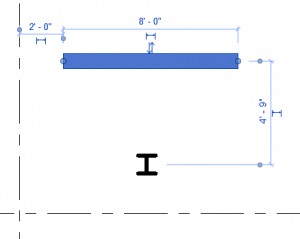
When selecting an element, beginners are taught that the little blue dimensions that appear are temporary dimensions.  Unfortunately the temporary dimensions do not always show dimensions between the elements we would like.  To change this, grab the little blue dot and drag it to change the witness line.  In addition, for some elements such as walls and columns, clicking on the grip will cause the dimension to cycle from face, to centerline, to the other face.

Here are two bonus tips about temporary dimensions: First, in the graphics tab of the Revit options in the application menu (the big R), the size and opacity of the temporary dimension text can be edited. If it is too small or is being obscured, simply change the options.

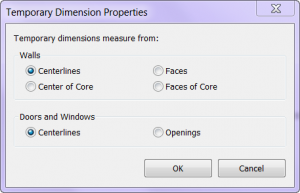
The second bonus tip is that the default locations of temporary dimensions can be changed under Manage Tab: Additional Settings: Temporary Dimensions.  This is useful if a user would prefer always to dimension wall faces and/or opening widths instead of their centerlines.

Revit Basics – Selecting a Detail Bubble

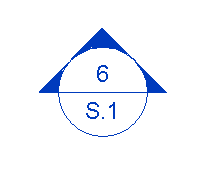
For several reasons Revit users will often want to show only the bubble portion of a section cut or a callout.  For example, they want a bubble shown thus:

This is normally achieved via pulling the tail in very close.  Unfortunately, that part of the bubble is what one would click in order to select the section cut (since clicking on the bubble itself will not work).  There are a few ways to get around this, some more common than others.

First, one might draw selection/crossing window to select the bubble.  This will work, but might cause other objects to also become selected.

Second, using the omnipresent tab method to tab to the bubble will work.

Finally, perhaps the least known solution, holding down the control button will allow the bubble to be selected by clicking it.

This works with all veiw types including Levels, Sections and Callouts.